2020
December
安装nvm失败问题
- 查看 raw.githubusercontent.com 的域名是否更改
- 终端 cd /etc
- 打开 hosts 文件,修改对应地址为最新域名
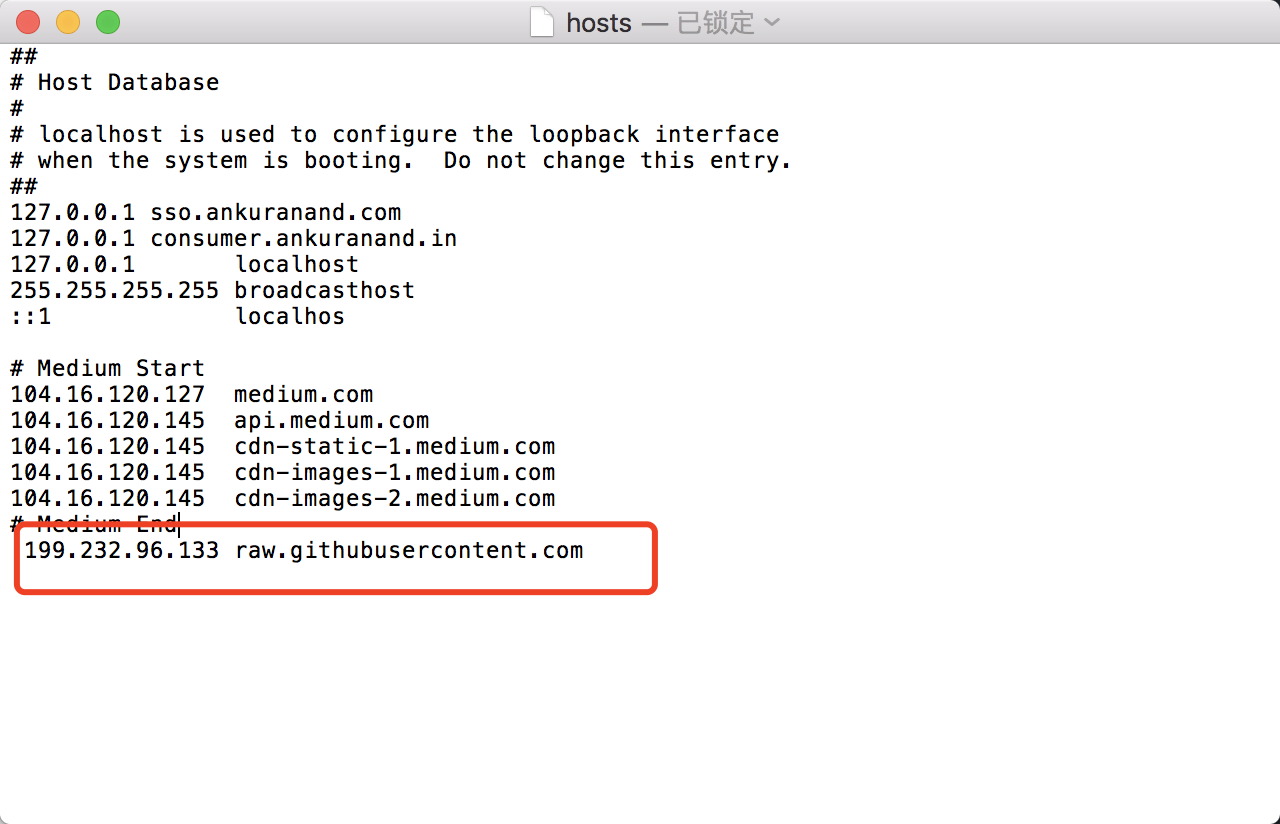
注意 使用 sudo vi hosts 进入文件后 i 操作文件,完成后按esc结束,然后 shift + :wq 保存跳出
常见的 MIME_TYPE
export const MIME_TYPE_LIST = {
    '*': 'application/octet-stream',
    '323': 'text/h323',
    acx: 'application/internet-property-stream',
    ai: 'application/postscript',
    aif: 'audio/x-aiff',
    aifc: 'audio/x-aiff',
    aiff: 'audio/x-aiff',
    asf: 'video/x-ms-asf',
    asr: 'video/x-ms-asf',
    asx: 'video/x-ms-asf',
    au: 'audio/basic',
    avi: 'video/x-msvideo',
    axs: 'application/olescript',
    bas: 'text/plain',
    bcpio: 'application/x-bcpio',
    bin: 'application/octet-stream',
    bmp: 'image/bmp',
    c: 'text/plain',
    cat: 'application/vnd.ms-pkiseccat',
    cdf: 'application/x-cdf',
    cer: 'application/x-x509-ca-cert',
    class: 'application/octet-stream',
    clp: 'application/x-msclip',
    cmx: 'image/x-cmx',
    cod: 'image/cis-cod',
    cpio: 'application/x-cpio',
    crd: 'application/x-mscardfile',
    crl: 'application/pkix-crl',
    crt: 'application/x-x509-ca-cert',
    csh: 'application/x-csh',
    css: 'text/css',
    dcr: 'application/x-director',
    der: 'application/x-x509-ca-cert',
    dir: 'application/x-director',
    dll: 'application/x-msdownload',
    dms: 'application/octet-stream',
    doc: 'application/msword',
    docx:
        'application/vnd.openxmlformats-officedocument.wordprocessingml.document',
    dot: 'application/msword',
    dvi: 'application/x-dvi',
    dxr: 'application/x-director',
    eps: 'application/postscript',
    etx: 'text/x-setext',
    evy: 'application/envoy',
    exe: 'application/octet-stream',
    fif: 'application/fractals',
    flr: 'x-world/x-vrml',
    gif: 'image/gif',
    gtar: 'application/x-gtar',
    gz: 'application/x-gzip',
    h: 'text/plain',
    hdf: 'application/x-hdf',
    hlp: 'application/winhlp',
    hqx: 'application/mac-binhex40',
    hta: 'application/hta',
    htc: 'text/x-component',
    htm: 'text/html',
    html: 'text/html',
    htt: 'text/webviewhtml',
    ico: 'image/x-icon',
    ief: 'image/ief',
    iii: 'application/x-iphone',
    ins: 'application/x-internet-signup',
    isp: 'application/x-internet-signup',
    jfif: 'image/pipeg',
    jpe: 'image/jpeg',
    jpeg: 'image/jpeg',
    jpg: 'image/jpeg',
    png: 'image/png',
    js: 'application/x-javascript',
    latex: 'application/x-latex',
    lha: 'application/octet-stream',
    lsf: 'video/x-la-asf',
    lsx: 'video/x-la-asf',
    lzh: 'application/octet-stream',
    m13: 'application/x-msmediaview',
    m14: 'application/x-msmediaview',
    m3u: 'audio/x-mpegurl',
    man: 'application/x-troff-man',
    mdb: 'application/x-msaccess',
    me: 'application/x-troff-me',
    mht: 'message/rfc822',
    mhtml: 'message/rfc822',
    mid: 'audio/mid',
    mny: 'application/x-msmoney',
    mov: 'video/quicktime',
    movie: 'video/x-sgi-movie',
    mp2: 'video/mpeg',
    mp3: 'audio/mpeg',
    mpa: 'video/mpeg',
    mpe: 'video/mpeg',
    mpeg: 'video/mpeg',
    mpg: 'video/mpeg',
    mpp: 'application/vnd.ms-project',
    mpv2: 'video/mpeg',
    ms: 'application/x-troff-ms',
    mvb: 'application/x-msmediaview',
    nws: 'message/rfc822',
    oda: 'application/oda',
    p10: 'application/pkcs10',
    p12: 'application/x-pkcs12',
    p7b: 'application/x-pkcs7-certificates',
    p7c: 'application/x-pkcs7-mime',
    p7m: 'application/x-pkcs7-mime',
    p7r: 'application/x-pkcs7-certreqresp',
    p7s: 'application/x-pkcs7-signature',
    pbm: 'image/x-portable-bitmap',
    pdf: 'application/pdf',
    pfx: 'application/x-pkcs12',
    pgm: 'image/x-portable-graymap',
    pko: 'application/ynd.ms-pkipko',
    pma: 'application/x-perfmon',
    pmc: 'application/x-perfmon',
    pml: 'application/x-perfmon',
    pmr: 'application/x-perfmon',
    pmw: 'application/x-perfmon',
    pnm: 'image/x-portable-anymap',
    pot: 'application/vnd.ms-powerpoint',
    ppm: 'image/x-portable-pixmap',
    pps: 'application/vnd.ms-powerpoint',
    ppt: 'application/vnd.ms-powerpoint',
    pptx:
        'application/vnd.openxmlformats-officedocument.presentationml.presentation',
    prf: 'application/pics-rules',
    ps: 'application/postscript',
    pub: 'application/x-mspublisher',
    qt: 'video/quicktime',
    ra: 'audio/x-pn-realaudio',
    ram: 'audio/x-pn-realaudio',
    ras: 'image/x-cmu-raster',
    rgb: 'image/x-rgb',
    rmi: 'audio/mid',
    roff: 'application/x-troff',
    rtf: 'application/rtf',
    rtx: 'text/richtext',
    scd: 'application/x-msschedule',
    sct: 'text/scriptlet',
    setpay: 'application/set-payment-initiation',
    setreg: 'application/set-registration-initiation',
    sh: 'application/x-sh',
    shar: 'application/x-shar',
    sit: 'application/x-stuffit',
    snd: 'audio/basic',
    spc: 'application/x-pkcs7-certificates',
    spl: 'application/futuresplash',
    src: 'application/x-wais-source',
    sst: 'application/vnd.ms-pkicertstore',
    stl: 'application/vnd.ms-pkistl',
    stm: 'text/html',
    svg: 'image/svg+xml',
    sv4cpio: 'application/x-sv4cpio',
    sv4crc: 'application/x-sv4crc',
    swf: 'application/x-shockwave-flash',
    t: 'application/x-troff',
    tar: 'application/x-tar',
    tcl: 'application/x-tcl',
    tex: 'application/x-tex',
    texi: 'application/x-texinfo',
    texinfo: 'application/x-texinfo',
    tgz: 'application/x-compressed',
    tif: 'image/tiff',
    tiff: 'image/tiff',
    tr: 'application/x-troff',
    trm: 'application/x-msterminal',
    tsv: 'text/tab-separated-values',
    txt: 'text/plain',
    uls: 'text/iuls',
    ustar: 'application/x-ustar',
    vcf: 'text/x-vcard',
    vrml: 'x-world/x-vrml',
    wav: 'audio/x-wav',
    wcm: 'application/vnd.ms-works',
    wdb: 'application/vnd.ms-works',
    wks: 'application/vnd.ms-works',
    wmf: 'application/x-msmetafile',
    wps: 'application/vnd.ms-works',
    wri: 'application/x-mswrite',
    wrl: 'x-world/x-vrml',
    wrz: 'x-world/x-vrml',
    xaf: 'x-world/x-vrml',
    xbm: 'image/x-xbitmap',
    xla: 'application/vnd.ms-excel',
    xlc: 'application/vnd.ms-excel',
    xlm: 'application/vnd.ms-excel',
    xls: 'application/vnd.ms-excel',
    xlsx: 'application/vnd.openxmlformats-officedocument.spreadsheetml.sheet',
    xlt: 'application/vnd.ms-excel',
    xlw: 'application/vnd.ms-excel',
    xof: 'x-world/x-vrml',
    xpm: 'image/x-xpixmap',
    xwd: 'image/x-xwindowdump',
    z: 'application/x-compress',
    zip: 'application/zip'
};
Oct
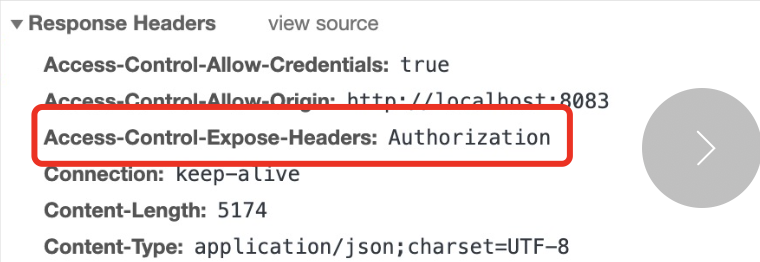
获取后台暴露在响应头里的信息
需要后台设置response.setHeader("Access-Control-Expose-Headers", "Authorization");
August
element 组件 el-tabs 导致页面崩溃
建议升级 vue 版本到 2.6.0 以上(vue-template-compiler 也要同步)
render 函数中给标签添加动态多类名写法:
class={[${"panel-font-" + depth}, this.config === "json" ? "font-bold" : ""]}
July
tomcat 异常被关闭
情况 1:tomcat 配置的端口号与其他 tomcat 相同,被他人关闭了
- tomcat
- conf
- server.xml
- conf
这个 server.xml 中配置的 port 与其他 tomcat 相同,所以被关掉了
Jane
常见验证
export const checkStr = (str, type) => {
  switch (type) {
    case "phone": //手机号码
      return /^1[3|4|5|6|7|8|9][0-9]{9}$/.test(str);
    case "tel": //座机
      return /^(0\d{2,3}-\d{7,8})(-\d{1,4})?$/.test(str);
    case "card": //身份证
      return /(^\d{15}$)|(^\d{18}$)|(^\d{17}(\d|X|x)$)/.test(str);
    case "pwd": //密码以字母开头,长度在6~18之间,只能包含字母、数字和下划线
      return /^[a-zA-Z]\w{5,17}$/.test(str);
    case "postal": //邮政编码
      return /[1-9]\d{5}(?!\d)/.test(str);
    case "QQ": //QQ号
      return /^[1-9][0-9]{4,9}$/.test(str);
    case "email": //邮箱
      return /^[\w-]+(\.[\w-]+)*@[\w-]+(\.[\w-]+)+$/.test(str);
    case "money": //金额(小数点2位)
      return /^\d*(?:\.\d{0,2})?$/.test(str);
    case "URL": //网址
      return /(http|ftp|https):\/\/[\w\-_]+(\.[\w\-_]+)+([\w\-\.,@?^=%&:/~\+#]*[\w\-\@?^=%&/~\+#])?/.test(
        str
      );
    case "IP": //IP
      return /((?:(?:25[0-5]|2[0-4]\\d|[01]?\\d?\\d)\\.){3}(?:25[0-5]|2[0-4]\\d|[01]?\\d?\\d))/.test(
        str
      );
    case "date": //日期时间
      return (
        /^(\d{4})\-(\d{2})\-(\d{2}) (\d{2})(?:\:\d{2}|:(\d{2}):(\d{2}))$/.test(
          str
        ) || /^(\d{4})\-(\d{2})\-(\d{2})$/.test(str)
      );
    case "number": //数字
      return /^[0-9]$/.test(str);
    case "english": //英文
      return /^[a-zA-Z]+$/.test(str);
    case "chinese": //中文
      return /^[\\u4E00-\\u9FA5]+$/.test(str);
    case "lower": //小写
      return /^[a-z]+$/.test(str);
    case "upper": //大写
      return /^[A-Z]+$/.test(str);
    case "HTML": //HTML标记
      return /<("[^"]*"|'[^']*'|[^'">])*>/.test(str);
    default:
      return true;
  }
};

// 身份证 信息验证
export const isCardID = (sId) => {
  if (!/(^\d{15}$)|(^\d{17}(\d|X|x)$)/.test(sId)) {
    console.log("你输入的身份证长度或格式错误");
    return false;
  }
  //身份证城市
  var aCity = {
    11: "北京",
    12: "天津",
    13: "河北",
    14: "山西",
    15: "内蒙古",
    21: "辽宁",
    22: "吉林",
    23: "黑龙江",
    31: "上海",
    32: "江苏",
    33: "浙江",
    34: "安徽",
    35: "福建",
    36: "江西",
    37: "山东",
    41: "河南",
    42: "湖北",
    43: "湖南",
    44: "广东",
    45: "广西",
    46: "海南",
    50: "重庆",
    51: "四川",
    52: "贵州",
    53: "云南",
    54: "西藏",
    61: "陕西",
    62: "甘肃",
    63: "青海",
    64: "宁夏",
    65: "新疆",
    71: "台湾",
    81: "香港",
    82: "澳门",
    91: "国外",
  };
  if (!aCity[parseInt(sId.substr(0, 2))]) {
    console.log("你的身份证地区非法");
    return false;
  }
  // 出生日期验证
  var sBirthday = (
      sId.substr(6, 4) +
      "-" +
      Number(sId.substr(10, 2)) +
      "-" +
      Number(sId.substr(12, 2))
    ).replace(/-/g, "/"),
    d = new Date(sBirthday);
  if (
    sBirthday !=
    d.getFullYear() + "/" + (d.getMonth() + 1) + "/" + d.getDate()
  ) {
    console.log("身份证上的出生日期非法");
    return false;
  }

  // 身份证号码校验
  var sum = 0,
    weights = [7, 9, 10, 5, 8, 4, 2, 1, 6, 3, 7, 9, 10, 5, 8, 4, 2],
    codes = "10X98765432";
  for (var i = 0; i < sId.length - 1; i++) {
    sum += sId[i] * weights[i];
  }
  var last = codes[sum % 11]; //计算出来的最后一位身份证号码
  if (sId[sId.length - 1] != last) {
    console.log("你输入的身份证号非法");
    return false;
  }

  return true;
};
May
远程服务器查看 tomcat 是否启动
步骤:
- 打开终端
- 输入
sudo ssh -i /Users/linjy/A_Yolanda/Dist/DME/distdata.pem root@52.83.214.66 -p 15874 - 输入
cd / - 输入
ls查找到 tomcat 所在目录如 opt/tomcat-dme-web/ - 输入
cd opt/tomcat-dme-web/bin/ - 输入
ls查找 startup.sh - 输入
ps -ef|grep java检查 tomcat 是否已经启动,若没有启动 - 输入
sh startup.sh
April
图片 url 下载的兼容方式
axios.get(url, { responseType: "blob" }).then(
  (res) => {
    this.imgLoading = false;
    let fileName = null;
    if (res.data.type === "image/jpeg") {
      fileName = `${name}.jpg`;
    }
    if (res.status === 200) {
      if (typeof window.chrome !== "undefined") {
        // Chrome
        const link = document.createElement("a");
        link.href = window.URL.createObjectURL(res.data);
        link.download = fileName;
        link.click();
        // 释放内存
        window.URL.revokeObjectURL(link.href);
      } else if (typeof window.navigator.msSaveBlob !== "undefined") {
        // IE
        const blob = new Blob([res.data], {
          type: "application/force-download",
        });
        window.navigator.msSaveBlob(blob, fileName);
      } else {
        // Firefox
        const file = new File([res.data], fileName, {
          type: "application/force-download",
        });
        window.open(URL.createObjectURL(file));
      }
    }
  },
  (error) => {
    console.error("error", error);
  }
);
if...else if...else 优化
项目中经常会遇到判断逻辑,常常会用到if...else...,如果不想层级太多,难以维护,一般情况我们会选择用 switch 语句,如下例子:
用一个 returnDay() 方法返回‘今天是星期几’
// 使用if else
returnDay() {
  let string = '今天星期'
  const date = new Date().getDay()
  if (date === 0) {
    string += '日'
  } else if (date === 1) {
    string += '一'
  } else if (date === 2) {
    string += '二'
  }
  // ...
  return string
}

// 使用 switch{} 语句
returnDay() {
 switch (date) {
    case 0:
      string += '日'
      break
    case 1:
      string += '一'
      break
    case 2:
      string += '二'
      break
    // ...
    default:
      break
      }
      return string
    }
}

// 优化
returnDay() {
  let string = '今天星期'
  const date = new Date().getDay()
  // 使用数组
  const dateArr = ['天','一','二','三','四','五','六']
  // 或使用对象
  const dateArr = {
    0: '天',
    1: '一',
    2: '二',
    3: '三',
    4: '四',
    5: '五',
    6: '六'
  }
  return string + dateArr[date]
}
多重条件判断还可以使用includes
if (code === 202 || code === 203 || code === 204) {
  //
}
// 可以改成
if ([202, 203, 204].includes(code)) {
  //
}
获取响应头中的 Authorization
需要后端同时设置 Access-Control-Expose-Headers : 'Authorization'
这样才是设置成功了,前端才能读取:
如何在请求头中加入以上读取到的 Authorization
  // 拦截器
  interceptors() {
    // 请求拦截
    this.instance.interceptors.request.use(
      config => {
        // 判断vuex中是否存在Authorization
        if (store.getters.authorization) {
          // 请求头携带token
          config.headers.Authorization = store.getters.authorization
        }
        return config
      },
      error => Promise.reject(error) // 请求失败
    )
    // 响应拦截
    this.instance.interceptors.response.use(
      response => {
        const { status, data, headers } = response
        const authorization = headers.authorization ? headers.authorization : null
        store.commit('appConfig/SET_AUTHORIZATION', authorization)
        // 不直接写data.code === 1000的原因是下载类接口没有任何代码
        if (status === 200 && data.code !== 2000 && data.code !== 3000) {
          return Promise.resolve(data)
        }
        return Promise.reject(response)
      },
      error => Promise.reject(error)
    )
  }
表单验证失败(拿不到 value 值)或输入框无法输入数据
原因可能是: 表单绑定的对象上没有这个需要验证的属性或输入框绑定的值,如下:
<template>
  <div>
    <el-form :model="formData" :rules="rules" ref="Form">
      <el-form-item label="名称" prop="name">
        <el-input v-model="formData.name"> </el-input>
      </el-form-item>
      <el-form-item label="年龄" prop="age">
        <el-input v-model="formData.age"> </el-input>
      </el-form-item>
      <el-form-item label="性别" prop="sex">
        <el-input v-model="formData.sex"> </el-input>
      </el-form-item>
    </el-form>
  </div>
</template>

<script>
  export default {
    name: "",
    props: {},
    data() {
      return {
        formData: {
          name: "",
          age: "",
          // sex : '' // 如果这里没有sex 会出现验证失败和输入框无法输入的问题
        },
      };
    },
  };
</script>
span 标签内容是英文时,不会自动换行
原因: span 不是块状元素,本身自带有左浮动效果,连续的英文和数字是不会自动换行 解决: 设置:
display: inline-block;
width: 100%;
word-wrap: break-word;
white-space: normal;
March
iview 表格宽度自适应
思路:给表格一个外容器,根据外容器的宽度自适应
<div class="table-container" ref="tableContent">
  <table :columns="colums" :data="ysjTable"></table>
</div>
  mounted() {
    this.handleResize();
    window.addEventListener("resize", this.handleResize);
  }
  destroyed() {
    window.removeEventListener("resize", this.handleResize);
  }
  private handleResize() {
    if (this.$refs.tableContent) {
      this.tableHeight = (this.$refs.tableContent as Element).clientHeight;
    }
  }
表格行数据进行上下移操作
  private handleUpDown(name: string) {
    this.upDownOper = name;
    const { upDownOper, ysjTable, selection } = this;
    if (selection.length) {
      if (upDownOper === "up") {
        selection.forEach((row: any) => {
          const index = ysjTable.findIndex(item => item.name === row.name);
          if (index !== -1 && index !== 0) {
            ysjTable.splice(index, 1);
            ysjTable.splice(index - 1, 0, row);
          }
        });
      } else if (upDownOper === "down") {
        selection.reverse().forEach((row: any) => {
          const index = ysjTable.findIndex(item => item.name === row.name);
          if (index !== -1 && index !== ysjTable.length - 1) {
            ysjTable.splice(index, 1);
            ysjTable.splice(index + 1, 0, row);
          }
        });
      }
    }
  }
4.13 版 iview 树形表格动态添加子节点报错失效问题
一般情况下会拿到行数据row去添加我们的子节点,但是这种情况下,iview 会直接报错
原因是:这种情况下添加的子节点没有生成对应的_index, _rowKey 属性而导致报错
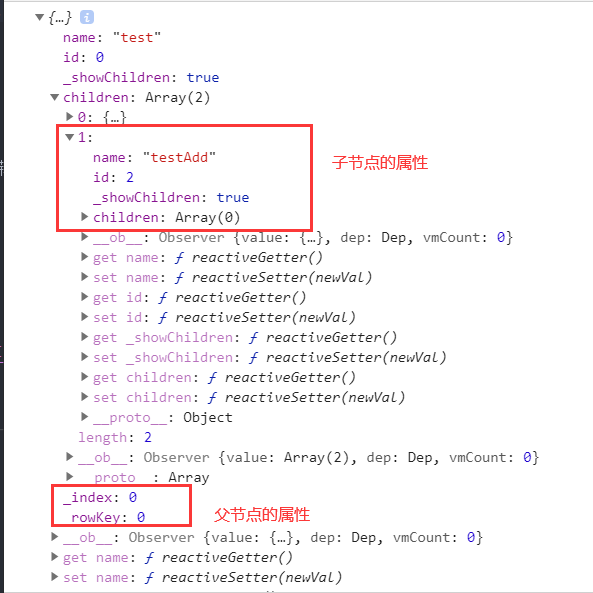
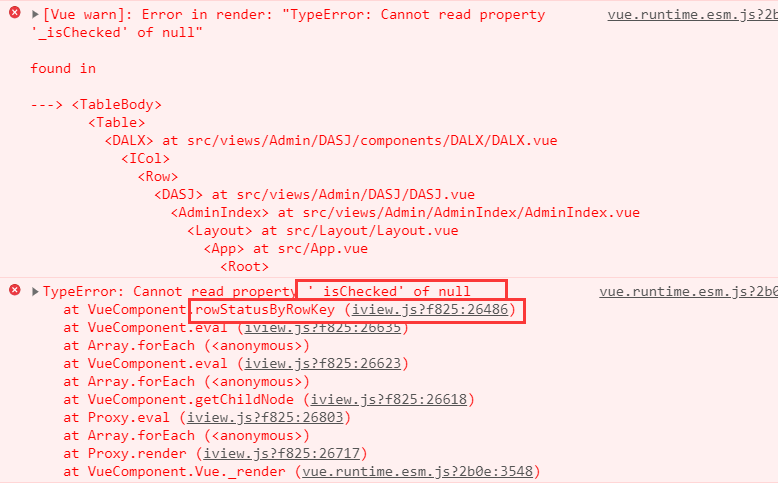
需要直接拿到 row 的 index 值 然后从总数据上添加
const temp = {
  name: this.keyName,
  id: this.tableLength,
  _showChildren: true,
  children: [],
};
this.tabelData[this.rowIndex].children.push(temp);
iview 树形结构的 table index 序号不是按每行递增 子节点会以父节点为 0 递增
新版 Chrome 携带 Cookie 问题
即使设置了axios.defaults.withCredentials = true 请求还是无法正常携带 Cookie。发现警告:

原来是新版 Chorme 的问题,只能暂时禁用这些功能:
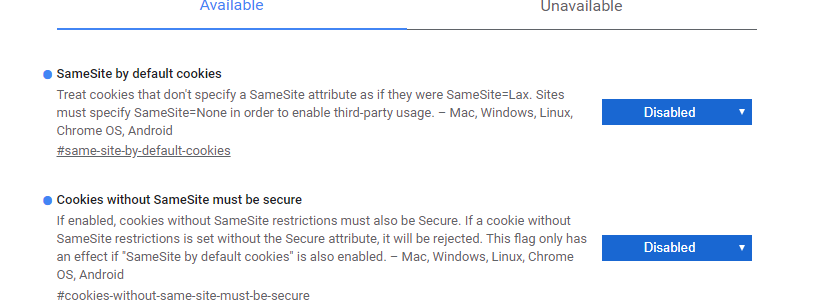
需要后台重新设置配置,才能让请求正常携带 Cookie
February
blob 转成 file
截图生成的blob对象需要转成file后上传
// this.cropImg 就是一个blob对象
const file = new window.File([this.cropImg], this.cropImg.name, {
  type: this.cropImg.type,
});
file.uid = this.fileInfo.uid;
const formData = new FormData();
formData.append("file", file);
Object.defineProperty 数据劫持
虽然日常开发中比较少用到这个方法,但 Vue 却是利用这个 ES5 的方法实现了数据响应变化(待处理)
使用 canvas 实现用户头像上传
基础 API
<canvas id="drawing" width="200" height="200" ref="drawing"
  >A drawing of something</canvas
>
const { drawing } = this.$refs;
if (drawing.getContext) {
  // 获取 2D 上下文
  const context = drawing.getContext("2d");

  // toDataURL() 导出 canvas 元素上绘制的图像

  // 填充颜色为红色
  context.fillStyle = "#ff0000";
  context.fillRect(10, 10, 50, 50);

  // 边框颜色为蓝色
  context.strokeStyle = "rgba(0,0,255,0.5)";
  context.strokeRect(30, 30, 50, 50);

  // 清除画布上的矩形区域
  context.clearRect(40, 40, 10, 10);

  // 开始绘制新路径,必须
  context.beginPath();

  // 绘制外圆
  context.arc(100, 100, 99, 0, 2 * Math.PI, false);

  // 绘制内圆
  context.moveTo(194, 100);
  context.arc(100, 100, 94, 0, 2 * Math.PI, false);

  // 绘制分针
  context.moveTo(100, 100);
  context.lineTo(100, 15);

  // 绘制时针
  context.moveTo(100, 100);
  context.lineTo(35, 100);

  // 描边路径,必须
  context.stroke();

  // 绘制文本
  context.font = "bold 14px Arial"; // 参数:文本样式、大小、字体
  context.textAlign = "center"; // 文本水平对齐方式:start、center、end
  context.testBaseline = "middle"; // 文本垂直对齐方式:top、middle、bottom、hanging、alphabetic、ideographic
  context.fillText("12", 100, 20); // 参数:文本字符串、x坐标、y坐标、可选的最大像素高度

  // 坐标原点变换
  context.translate(100, 100);

  // 保存上下文的状态 save()
  context.save();

  // 回退上一级上下文的设置状态 restore()
  context.restore();
}
绘制图像:利用drawImage将图像绘制到画布上
const { drawing, sourceImg } = this.$refs;
const imgObject = new Image();
imgObject.src = sourceImg.src;
if (drawing.getContext) {
  const context = drawing.getContext("2d");
  // 绘制图像方法 参数:源图像对象、源图像x坐标、源图像y坐标、源图像宽度、源图像高度、目标图像x坐标、目标图像y坐标、目标图像宽度、目标图像高度
}
一个上传用户头像的小栗子:(三部分: template、script、css)
<template>
  <div class="component-container" ref="container">
    <canvas class="canvas-img-preview" ref="sourceImg"></canvas>
    <div
      class="crop-container"
      ref="cropContainer"
      @dragstart="stopDrag"
      @mousedown.stop="initMove"
    >
      <span
        class="zoom-button"
        ref="zoomButton"
        @dragstart="stopDrag"
        @mousedown.stop="initZoom"
        >口</span
      >
      <canvas
        class="crop-canvas"
        ref="cropCanvas"
        @dragstart="stopDrag"
      ></canvas>
    </div>
  </div>
</template>
// export default {
  name: 'xz-crop',
  props: {
    imageUrl: String, // 传入文件url
    getCropImgBlob: Function // 返回裁剪后的文件(blob)
  },
  data() {
    return {
      sourceImgWidth: null, // 被剪切照片容器宽度
      sourceImgHeight: null, // 被剪切照片容器高度
      cropCanvasWidth: null, // 裁剪框的宽度
      cropCanvasHeight: null, // 裁剪框的高度
      cropOffsetImgLeft: null, // 裁剪框距离sourceImg的left
      cropOffsetImgTop: null, // 裁剪框距离sourceImg的top
      targetImg: null, // 裁剪后的目标图片
      targetImgWidth: null, // 目标宽度
      targetImgHeigth: null, // 目标高度
      targetImgLeft: null, // 目标左位移
      targetImgTop: null, // 目标上位移
      cropContext: null, // 2D上下文对象
      imageObj: null, // 照片对象
      blankHeight: null, // 组件上下空白高度
      blankWidth: null, // 组件左右空白高度
      lock: false, // 是否锁定裁剪框大小
      crop: {}, // 移动剪切框必要数据
      zoom: {} // 缩放剪切框必要数据
    }
  },
  watch: {
    // 监听图片URL以进行更新
    imageUrl(newValue) {
      this.imageObj.src = newValue
    }
  },
  created() {
    this.init()
  },
  methods: {
    init() {
      // toBlob()方法的Polyfill
      if (!HTMLCanvasElement.prototype.toBlob) {
        Object.defineProperty(HTMLCanvasElement.prototype, 'toBlob', {
          value(callback, type, quality) {
            const binStr = atob(this.toDataURL(type, quality).split(',')[1])
            const len = binStr.length
            const arr = new Uint8Array(len)

            for (let i = 0; i < len; i++) {
              arr[i] = binStr.charCodeAt(i)
            }

            callback(new Blob([arr], { type: type || 'image/png' }))
          }
        })
      }

      this.imageObj = new Image()
      if (this.imageUrl !== null) {
        this.targetImg = document.createElement('canvas') // 创建导出图片所用canvas
        this.imageObj.src = this.imageUrl
        this.imageObj.onload = () => {
          const {
            cropCanvas, container, sourceImg, cropContainer
          } = this.$refs
          const { width, height } = this.imageObj
          const sourceWidth = width / (height / container.offsetHeight)
          const sourceHeight = height / (width / container.offsetWidth)
          this.sourceImgWidth = width > height ? container.offsetWidth : sourceWidth
          this.sourceImgHeight = height > width ? container.offsetHeight : sourceHeight

          // 设置源图像的宽高
          sourceImg.width = this.sourceImgWidth // 通过vue的响应系统太慢,不如直接写入,类似皆是相同原理
          sourceImg.height = this.sourceImgHeight

          const { sourceImgWidth, sourceImgHeight } = this

          // 计算左右、上下空白的高度(单个纯黑色区域)
          this.blankWidth = (container.offsetWidth - sourceImgWidth) / 2
          this.blankHeight = (container.offsetHeight - sourceImgHeight) / 2

          // 记录并设置裁剪框大小
          const { blankHeight, blankWidth } = this
          if (width > height) {
          // 当宽大于高时,以高为边作正方形裁剪框
            sourceImg.style.top = `${blankHeight}px`
            this.cropCanvasWidth = sourceImgHeight - 2
            this.cropCanvasHeight = sourceImgHeight - 2
          } else {
          // 当高大于宽时,以宽为边作正方形裁剪框
            sourceImg.style.left = `${blankWidth}px`
            this.cropCanvasWidth = sourceImgWidth - 2
            this.cropCanvasHeight = sourceImgWidth - 2
          }

          // 设置裁剪框的宽高
          cropCanvas.width = this.cropCanvasWidth
          cropCanvas.height = this.cropCanvasHeight

          // 获取裁剪框二维上下文对象
          this.cropContext = cropCanvas.getContext('2d')

          // canvasImg设定高度完成后
          this.$nextTick(() => {
          // 展示源image的缩放图作为底图
            sourceImg
              .getContext('2d')
              .drawImage(this.imageObj, 0, 0, sourceImgWidth, sourceImgHeight)

            const { cropCanvasHeight, cropCanvasWidth } = this

            // 计算并设置裁剪框容器的偏移位置
            this.cropOffsetImgTop = (sourceImgHeight - cropCanvasHeight) / 2
            this.cropOffsetImgLeft = (sourceImgWidth - cropCanvasWidth) / 2
            cropContainer.style.top = `${blankHeight + this.cropOffsetImgTop}px`
            cropContainer.style.left = `${blankWidth + this.cropOffsetImgLeft}px`

            // 渲染裁剪框图片
            this.renderCanvasCrop(sourceImg)
            // 渲染裁剪目标框图片(实际想要的裁剪图片)
            this.renderTargetImg()
            // 获取裁剪后的图片
            this.getCropImg()
          })
        }
      }
      window.addEventListener('mouseup', this.clearAndGet) // 松开鼠标清空部分数据以及获取裁剪后的图片
      window.addEventListener('mousemove', this.moveZoomCrop) // (在当前sourceImg内点击时)移动鼠标时移动或缩放剪切框
    },

    /**
     * @msg: 移动缩放框
     */
    moveZoomCrop(e) {
      const {
        container, sourceImg, cropContainer, cropCanvas
      } = this.$refs

      const {
        zoom, crop, blankHeight, blankWidth
      } = this

      const { sourceImgWidth, sourceImgHeight } = this
      // 移动
      if (Object.keys(crop).length !== 0) {
        // 计算鼠标按下后的移动X\Y距离
        const moveX = e.clientX - crop.mouseDownX
        const moveY = e.clientY - crop.mouseDownY

        let cropConLeft = crop.cropConOffsetLeft + moveX
        let cropConTop = crop.cropConOffsetTop + moveY

        // 不允许移出框外
        // 当宽大于高时
        if (sourceImgWidth > sourceImgHeight) {
          if (cropConLeft < 0) cropConLeft = 0 // 左边界
          if (cropConTop < sourceImg.offsetTop) {
          // 上边界
            cropConTop = sourceImg.offsetTop
          }
        } else {
          // 当高大于宽时
          if (cropConTop < 0) cropConTop = 0 // 上边界
          if (cropConLeft < sourceImg.offsetLeft) {
            // 左边界
            cropConLeft = sourceImg.offsetLeft
          }
        }
        const maxTop = container.offsetHeight - cropCanvas.offsetHeight - blankHeight
        if (cropConTop > maxTop) {
          cropConTop = maxTop
        }
        const maxLeft = container.offsetWidth - cropCanvas.offsetWidth - blankWidth
        if (cropConLeft > maxLeft) {
          cropConLeft = maxLeft
        }

        // 设置裁剪框容器的位置并记录备用
        cropContainer.style.left = `${cropConLeft}px`
        cropContainer.style.top = `${cropConTop}px`
        this.cropOffsetImgTop = cropConTop - blankHeight
        this.cropOffsetImgLeft = cropConLeft - blankWidth

        // 渲染裁剪框内图像
        this.renderCanvasCrop(sourceImg)
        // 渲染目标图像
        this.renderTargetImg()
      }

      // 缩放
      if (Object.keys(zoom).length !== 0) {
        const moveX2 = e.clientX - zoom.mouseDownX
        const moveY2 = e.clientY - zoom.mouseDownY
        const bigger = moveX2 >= moveY2 ? moveX2 : moveY2 // 取X或Y中的最大
        const resultHeight = zoom.cropCanOffsetHeight + bigger // 移动后的结果高度
        const resultWidth = zoom.cropCanOffsetWidth + bigger // 移动后的结果宽度

        // 不允许超大
        const temp1 = resultHeight + cropContainer.offsetTop // 分开写的原因: 无法通过提交时自动eslint检查
        const tempHeight = temp1 - blankHeight
        const temp2 = resultWidth + cropContainer.offsetLeft
        const tempWidth = temp2 - blankWidth
        if (
          tempHeight < this.sourceImgHeight
          && tempWidth < this.sourceImgWidth
          && resultHeight > 0
          && resultWidth > 0
        ) {
          console.log('当鼠标在源图像范围内时')
          // 直接根据鼠标偏移量获得裁剪框的实际宽高
          this.lock = false
          cropCanvas.width = resultHeight
          cropCanvas.height = resultWidth
          // 记录裁剪框的宽高备用,下同
          this.cropCanvasWidth = cropCanvas.width
          this.cropCanvasHeight = cropCanvas.height
        } else if (resultHeight < 0 || resultWidth < 0) {
          this.lock = false
          cropCanvas.width = 0
          cropCanvas.height = 0
        } else {
          console.log('当鼠标划过右边缘或下边缘时')
          console.log(cropContainer.offsetLeft + resultWidth)
          console.log(cropContainer.offsetTop + resultHeight)
          const maxWidth = cropContainer.offsetLeft + resultWidth < this.sourceImgWidth
          const maxHeight = cropContainer.offsetTop + resultHeight < this.sourceImgHeight
          if ((maxWidth || maxHeight) && !this.lock) {
            console.log('1')
            this.lock = true
            if (sourceImgWidth > sourceImgHeight) {
              console.log('1: 宽>高')
              cropCanvas.width = sourceImgHeight - (cropContainer.offsetTop - blankHeight)
              cropCanvas.height = sourceImgHeight - (cropContainer.offsetTop - blankHeight)
            } else {
              console.log('1: 宽<高')
              cropCanvas.height = sourceImgWidth - (cropContainer.offsetLeft - blankWidth)
              cropCanvas.width = sourceImgWidth - (cropContainer.offsetLeft - blankWidth)
            }
          } else if (!(maxWidth || maxHeight) && !this.lock) {
            console.log('2')
            this.lock = true
            if (sourceImgWidth > sourceImgHeight) {
              console.log('2:宽>高')
              cropCanvas.width = sourceImgWidth - cropContainer.offsetLeft
              cropCanvas.height = sourceImgWidth - cropContainer.offsetLeft
            } else {
              console.log('2: 宽<高')
              cropCanvas.width = sourceImgHeight - cropContainer.offsetTop
              cropCanvas.height = sourceImgHeight - cropContainer.offsetTop
            }
          }
          //  else
          // if (cropContainer.offsetLeft + resultWidth === this.sourceImgWidth && !this.lock) {
          //   console.log(cropContainer.offsetLeft + resultWidth)
          // }

          this.cropCanvasWidth = cropCanvas.width
          this.cropCanvasHeight = cropCanvas.height
        }

        this.renderCanvasCrop(sourceImg)
        this.renderTargetImg()
      }
    },

    /**
     * @msg: 处理鼠标事件
     */
    initMove(e) {
      this.crop.cropConOffsetLeft = this.$refs.cropContainer.offsetLeft // 记录点击时剪切框容器的左位移
      this.crop.cropConOffsetTop = this.$refs.cropContainer.offsetTop // 记录点击时剪切框容器的上位移
      this.crop.mouseDownX = e.clientX // 记录点击时鼠标X
      this.crop.mouseDownY = e.clientY // 记录点击时鼠标Y
      this.zoom = {} // 防止触发缩放
    },

    /**
     * @msg: 清除和获取blob
     */
    clearAndGet() {
      this.zoom = {}
      this.crop = {}
      this.getCropImg()
    },

    /**
     * @msg: 处理缩放事件
     */
    initZoom(e) {
      this.zoom.cropCanOffsetHeight = this.$refs.cropCanvas.offsetHeight // 记录点击时剪切框本体的高度
      this.zoom.cropCanOffsetWidth = this.$refs.cropCanvas.offsetWidth // 记录点击时剪切框本体的宽度
      this.zoom.mouseDownX = e.clientX // 记录点击时鼠标X
      this.zoom.mouseDownY = e.clientY // 记录点击时鼠标Y
      this.crop = {} // 防止触发移动
    },

    /**
     * @msg: 阻止拖拽事件
     * @return: false
     */
    stopDrag() {
      return false
    },

    /**
     * @msg: 渲染裁剪框
     */
    renderCanvasCrop(source) {
      this.cropContext.drawImage(
        source,
        this.cropOffsetImgLeft,
        this.cropOffsetImgTop,
        this.cropCanvasWidth,
        this.cropCanvasHeight,
        0,
        0,
        this.cropCanvasWidth,
        this.cropCanvasHeight
      )
    },
    /**
     * @msg: 渲染裁剪后的图像
     */
    renderTargetImg() {
      // 计算实际要裁剪的数据
      const left = (this.cropOffsetImgLeft / this.sourceImgWidth) * this.imageObj.width
      this.targetImgLeft = Math.floor(left)
      const top = (this.cropOffsetImgTop / this.sourceImgHeight) * this.imageObj.height
      this.targetImgTop = Math.floor(top)
      const height = (this.cropCanvasHeight / this.sourceImgHeight) * this.imageObj.height
      this.targetImgHeigth = Math.floor(height)
      this.targetImgWidth = this.targetImgHeigth // 1:1比例

      this.targetImg.width = this.targetImgWidth // 设置目标canvas的宽
      this.targetImg.height = this.targetImgHeigth // 设置目标canvas的高
      // 写入图像
      this.targetImg
        .getContext('2d')
        .drawImage(
          this.imageObj,
          this.targetImgLeft,
          this.targetImgTop,
          this.targetImgWidth,
          this.targetImgHeigth,
          0,
          0,
          this.targetImgWidth,
          this.targetImgHeigth
        )
    },

    /**
     * @msg: 转换image数据为blob并导出
     */
    getCropImg() {
      this.targetImg.toBlob(
        blob => {
          this.getCropImgBlob(blob)
        },
        'image/jpeg',
        0.5
      )
    }
  },

  beforeDestroy() {
    // 清楚监听器
    window.removeEventListener('mouseup', this.clearAndGet)
    window.removeEventListener('mousemove', this.moveZoomCrop)
      }
    }
// }
<style scoped lang="scss">
.component-container {
  position: relative;
  width: 100%;
  height: 100%;
  background-color: #000000;
  .canvas-img-preview {
    position: absolute;
    opacity: 0.5;
    left: 0;
    top: 0;
  }
  .crop-container {
    position: absolute;
    top: 0;
    left: 0;
    .zoom-button {
      position: absolute;
      display: inline-block;
      right: 0;
      bottom: 3px;
      font-size: 12px;
      cursor: nw-resize;
      color: #ffffff;
    }
    .crop-canvas {
      cursor: move;
    }
  }
}
</style>
2018 →